Whether you are an Airsoft pro or Skeet shooter, knowing how to prep your gun for painting will make your weapon stand out on the field — or not if you go for a camouflage finish.
There are a few points to keep in mind when preparing to paint, and this guide takes you through them all, step by step.

Reasons to Paint Your Gun and Local Regulations
Before we get into the bones of this guide, let’s consider why you would paint your gun in the first place? Some people note that when done well, a paint job can increase your firearm’s value. However, most people revamp their machines to be inconspicuous on the field. A good paint job will remove any glossy sheen and cover up the harsh black that can blow your cover. Another great reason to coat your gun is to add a layer of protection against the elements and help prevent rust. In terms of legalities, in every US state, it’s illegal to paint hobby guns to look like real firearms. However, most states have no problem with camo finishes, just note that in some states, you have to leave the tip orange for transportation and reselling. For the most up-to-date recommendations for your area, check out your local state laws.

Pick Your Design
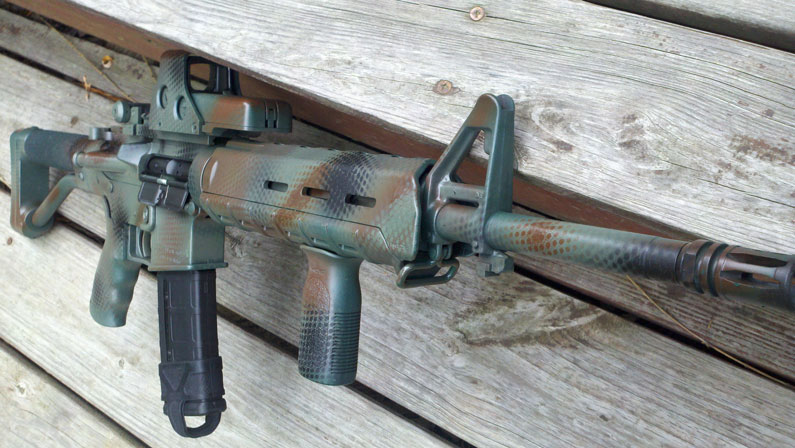
Now the fun begins, start by choosing your design. Do you want a Universal Camouflage Pattern in olive drab and brown? Or perhaps you want to blend in a little differently from your teammates and go for a leafy design. Another point to consider is whether you’ll coat the entire unit or just individual components.
Select Your Coating
While you can use aerosol paint such as the epoxy-based Brownells Aluma-Hyde II, I recommend a coating that’s compatible with a paint sprayer — more on why in a moment. Most enamel and acrylic-based coatings with a matte appearance are suitable for spraying weapons. Especially the 8-0850-1 Majic Paint Camouflage Coating, which provides protection from the elements and harsh weather conditions. Another great option is a Plasti Dip coating in gunmetal gray. Plasti Dip coatings are compatible with paint sprayers and easy to remove if you adapt your design to different environments in the future. You simply peel the paint job off and start again. The final benefit of this paint is that it dries to a rubberized finish that provides better grip, even in the wettest conditions. It’s better to opt for a matte finish as opposed to gloss, as the matte eliminates any reflection from sunlight.

Choose the Ideal Paint Sprayer
Now you’ve determined the paint you’ll use, you need to select a paint sprayer that’s compatible with the job at hand and your paint. You don’t need the mother of all spray guns to complete this task — it would be overkill. Instead, a smaller, portable device will help you reach all the firearm’s components. Technology-wise, a high-volume, low-pressure (HVLP) device that offers minimal bounceback and overspray is best suited to the task — more coating will land on the gun than the surrounding areas, never a bad thing! For even coverage on the first attempt, you want a fluid nozzle that’s compatible with mid to high-density coatings. If you’re new to the world of spray guns, the handheld Wagner FLEXiO 590 could be a great option. User-friendly options and ten-speed settings to adjust output make achieving the perfect finish easy. It also includes the Detail Finish nozzle that’s ideal for firearms, while the Lock-N-Go system makes for an easier clean-up. Another choice is the Neu Master HVLP 600 Watt Sprayer, which is fantastic at handling Plasti Dip. Featuring a floor-based turbine, the bulk of the weight remains on the ground, which stops your arms from getting tired on the job. To customize the unit to your needs, you have three spray patterns and an adjustable pressure dial. I recommend staying away from paintbrushes as they leave behind unsightly brush strokes that ruin the whole effect. On this note, while aerosol cans are okay, they’re not fitted with a dedicated nozzle or adjustments, so you have little control over the final finish.

Preparing Your Workspace and Yourself
As with any paint spraying activity, prepare your workspace properly for the best results. Find a clear area with no other objects around and lay down a groundsheet. It’s also a good idea to lay down some old cardboard boxes on the sheet as cardboard has no lint, which can stick to the surface of your weapon. Check that your area is well ventilated to minimize the build-up of paint fumes. Once done, start protecting yourself. Standard paint spraying apparel includes coveralls (or old clothes and shoes), gloves, eye goggles, and a face mask or respirator. Although using a spray gun is not usually a dangerous activity, wearing the correct gear protects you from accidental paint splashes and pressure injuries. While a respirator may sound like a substantial investment, there are many cheap and reusable units, for example, the 3M 6300 Half Facepiece Respirator.

Preparing Your Weapon
Now the majority of the graft is out of the way, it’s time to prep your weapon. Please note that this is a general tutorial that does not focus on any one individual product. For this reason, check out your individual weapon’s manual for breakdown instructions and any specific tools needed.
What You Need to Follow This Tutorial
Before you start, collect the following items:
- Your weapon.
- Explosion diagram for your pistol or rifle.
- Camera.
- Sandpaper.
- Decreasing agent or 91 percent isopropyl alcohol (for plastic parts).
- Gloves, coveralls, goggles, and face mask.
- Lint-free cloth.
- Masking tape.
- Kitchen towel.
- Barrel plug.
- Metal coat hangers.
- Paint sprayer.
- Chosen coating.
Method
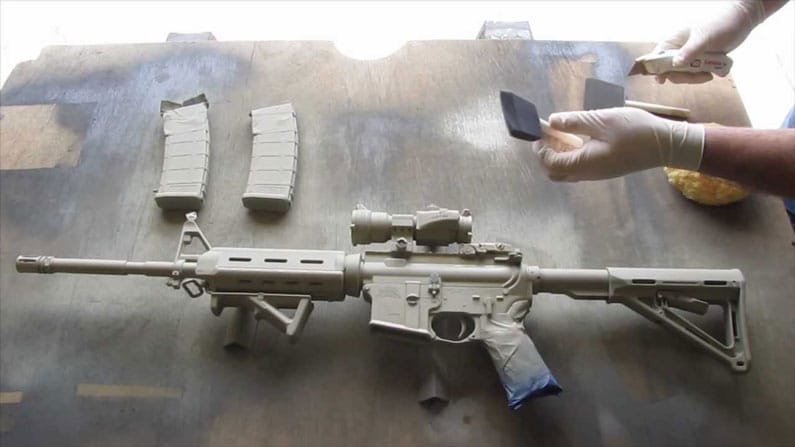
Before you start, collect the following items:1. If you’ve decided to paint part of the gun only, you need to break down the unit. Start by taking a photograph of your weapon before you start disassembling and during the process. After you disassemble it, lay the parts down per the explosion diagram and take another picture — these steps make putting your gun back together much easier.
2. Next, sand the components you wish to paint. Don’t be too vigorous, your aim is not to remove the existing surface but to create texture so the new coating adheres well.
3. Take your decreasing agent (which should dry without leaving any residue), don your gloves and coveralls to protect your hands and arms, then spray each metal part and wipe down with a lint-free cleaning cloth.
Don’t use the decreasing agent on plastic pieces as it will corrode these. For plastic components, use isopropyl alcohol. If you need to handle the weapon or parts after cleaning, use gloves to keep the oils from your hands and fingers off the weapon’s surface.
4. Block the barrel of your gun with a suitable barrel plug to stop paint pooling inside. Some tutorials note that you can complete this process with a paper towel, however, this isn’t advisable since paper can shred and leave remnants behind — use a custom-made appliance instead.
5. Tape any areas that you don’t wish to paint, such as the trigger guard and trigger. If your gun has a magazine, remove the cartridge and pack the empty hole with a kitchen towel then secure it in place with masking tape (you can use a kitchen towel to pack this space as it’s easier to access than the barrel).
6. Suspend your gun or gun components in the air using a metal coat hanger. This permits 360-degree access and saves you the hassle of waiting for one side to dry before moving on to the other side.
7. Put on your goggles and respirator and start setting up your paint sprayer. Ensure that the pressure and material settings are adjusted accordingly. Mix the coating thoroughly before adding it to the paint cup for even coverage.
Ready to paint? Here’s our full guide on how to paint your Airsoft gun.
Conclusion
And that’s it, you now know how to protect yourself and prep your weapon for a new paint job. Take your time and follow each step carefully. Degreasing, sanding, and wiping down might be time-consuming, but you’ll get a much better finish than if you skip these steps. Knowing how to prep your gun for painting is useful knowledge, so don’t share this article with your fellow Airsofters and friends!


