
Whatever your objective for drilling holes in glass, it’s a delicate operation with no room for error. That said, if you have the correct tools and know-how — it isn’t as tricky as you might think.
Let me show you — step-by-step — and you’ll understand what I mean.

Source: Wikimedia Commons
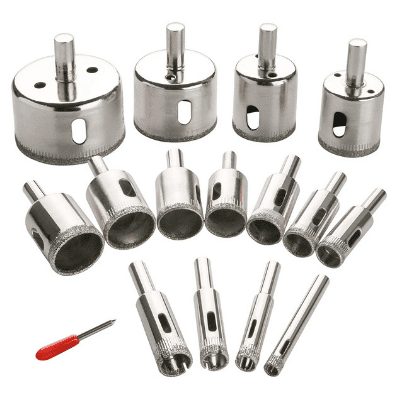
What Type Of Drill Bit and Drill Should You Use for Glass?
To master this technique, the proper tools are essential — here’s what you need to know.
Firstly, since glass drilling is an extremely delicate operation, ensure you have a variable speed drill with low revolutions. If you’re drilling holes in glass bottles or jars, you could employ the assistance of a drill press.
And, to avoid breaking the surface on the initial contact, check that your drill has a speed selector, or doesn’t start a full speed. In this case, less is more. As in, the lower the pace of the motor, the easier it will be for you to do the job.
At the business end, you’ll need special drill bits.
When drilling holes up to 13 mm, consider either tungsten carbide or a diamond-tip bit. For larger diameters, you need diamond bur handles drilling 20 mm to approximately 70 mm holes in thick glass.
While you could use the same bit as you would for plaster, tiles and soft materials, diamond-coated types won’t make an aggressive entry into the glass. Rather, it will work its way down smoothly as the drill rotates, without breaking the surface.
Types of Glass You Can’t Drill
While you can drill through glass varying in thickness — although the thinner it is, the more likely it is to break — as well as a glass bottle, jar or pane. There are some forms you can’t.
Tempered
Regardless of technique, tempered glass will shatter when drilled. Fabrication can only be done while the glass is still soft.
To identify — run your hands along the edges. Because of the extra processing, tempered glass has a smooth edge, unlike regular (annealed) types, which possess rough or scuffed edges. Alternatively, you could don your favorite pair of polarized sunglasses — if it’s tempered, the glass will display dark lines on the surface.
Laminated
Like tempered glass, you can’t drill or cut through laminated formats either, except while it’s still very soft, during the manufacturing process.
You can tell it’s a laminated glass by the edge. Laminated glass has visible interlayers and when knocked, sounds different from the tempered and annealed glass.
What You Will Need To Follow This Tutorial
Before we get down to the main event, I suggest you gather the following items together — so you have everything to hand to drill a hole in glass perfectly.
- Drill with a variable speed.
- Tungsten carbide glass bit or a diamond-coated bit (for holes up to 13 mm).
- Completely flat surface to support the glass — such as chipboard, plywood, or wood.
- Pad or cushioning material — cork, rubber etc.
- Sand — if drilling through a glass bottle or jar.
- Water spray or vaporizer to cool the bit and glass.
- Masking tape and marker pen.
- Protective clothing, safety glasses, and gloves.
- Sandpaper or a file suitable for glass.
- Clamping device — for bottle or jar.
- Scrap cardboard.
How to Drill Through a Glass Pane/Mirror — Step by Step Instructions
Step 1: Preparing to drill
- To prevent breakages, you’ll need to support your glass. If you want to work on a window or door, remove the pane beforehand. Lay down a pad, rubber, or another type of cushioning material onto your designated workspace — this will prevent the glass from moving around.
- Next, gauge where you intend to drill and apply some tape in that area. Now take your time and make your exact measurements.
To avoid a disastrous result — your drill point should be at least 2.5 cm away from the edge. This also applies if the glass is cracked at one point. In that case, make sure you are at least 3 cm away from any crack.
When you’re clear about where you want the drilling point to be, mark a letter ‘X’ on the masking tape.
Also, try to measure the depth you will need to completely drill the hole. This helps you establish how much force you will need to apply in the process.
- Take the bit and make a small hole or fulcrum on your target. The purpose of doing this is that, when you rest the drill on the marked point, the tool will not slide — meaning, more accurate drilling.
- Safety, in this case, is very important. Hence, now is the perfect time to put on your cut-resistant gloves, safety glasses, and overalls.
Step 2: Drilling the Glass
- After completing the marking task, place the bit back in the drill and secure it with the chuck or mechanism your device has for this purpose.
To make sure it’s properly adjusted, do a test run in the air by turning the power on and off several times. If everything works as it should, then you’re ready to drill the hole.
- Stand firm and place the drill, through the bit, in the area that you previously marked. Start drilling, at a very low speed until the glass is scored deeper. Check the glass isn’t under pressure. If this happens, stop and look for a bit with a thinner tip.
- Once the glass is suitably marked, remove the masking tape and increase the drill pace gradually — from level to level — reaching up to medium speed.
And, avoid sudden increases at all costs. Otherwise, the integrity of the glass may be compromised.
- It’s normal for friction from the bit to generate heat on the surface you’re working on. Therefore, you should apply lubricant or water at intervals to cool down the drilling area.
- When you’re nearing the end, you’ll feel the surface tightening a bit. At this point, you should flip the glass over to the other side, slow the drill down so that the bit doesn’t break the glass as it reaches depth, and continue drilling.
Even if the tension isn’t clear on the drill, pay attention when you start breaking through the other side. Reduce speed as required.
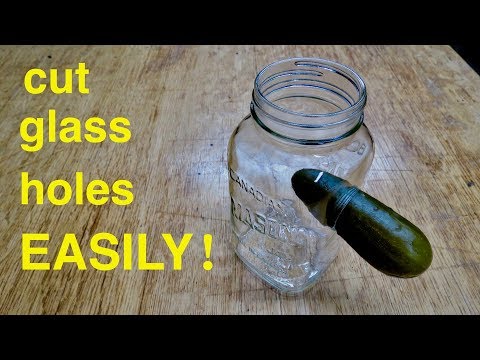
How To Drill a Hole in Glass Jar/Bottle or Curved Surface — Step by Step Instructions
If you want to drill glass bottle, jar, or any curved surface, a similar process as above would apply. Likewise, a diamond-tip bit is the recommended drill bit for glass bottles. However, there are a few added steps.
Step 1: Preparation
- First, fill up the bottle or jar with sand. This allows some of the vibrations to be absorbed.
- It’s also a good idea to hold the bottle firmly (on a wood lathe, for example) so you can drill it securely. Bear in mind, if clamping, you may wish to put some extra padding between your bottle or jar and the clamp.
And, when tightening your device, it’s important not to go overboard — gently does it.
Alternatively, you can lay your piece on a flat surface with some form of support underneath — a folded small towel would work.
- As you’re likely to be drilling on a curved surface, the chances of the bit slipping are possible. To avoid this and to get the hole started, stick some tape or a piece of cardboard to the jar or bottle in the region of your target.
- Now, mark the exact point you want to drill.
- Get dressed — put on your protective clothing.
Step 2: Drilling a Hole in Glass
- Place the drill, through the bit, in the area that you previously marked. Start drilling, at a very low speed until the hole is established.
- If you used tape or cardboard as a guide, now you can remove it.
- Resume drilling — slow and steady, and don’t apply too much pressure — keep it light — let the bit do the work. Spray lubricant or water frequently to prevent the bit or the glass overheating.
- Patience is required — depending on the thickness and diameter, it could take you a couple of minutes or more to reach the other side — don’t rush it.
- When the end is in sight, lift off the trigger and step down the pace even further.
- Once the drill has made it through and you have your hole in glass, take your bottle or jar and rinse off/out any debris and dust.
- And, for the finishing touch, you may also wish to file or sand the hole to smooth out any rough edges.
If you want a visual explanation and supplementary ideas on drilling glass, mirrors, bottles, and jars, check out the video.
Top Tips for Drilling Holes in Glass
- When drilling holes in glass bottles or jars practice, practice, practice — raid your recycling and make a few trial runs using junk bottles before you tackle your actual project.
- Remember, you can’t drill or cut tempered or laminated safety glass.
- Using a worn drill bit, just won’t cut it — make sure you have some brand spanking new bits for this job.
- Don’t press down on the glass — allow the drill to take the strain.
- Water and electricity don’t mix — be super-mindful when operating a corded drill. Cordless would be preferable.
- Prime scenarios for breakages include, lack of support, drilling at high speeds and overheating.
Conclusion
If the instructions are adhered to and it’s perfectly done, you’ll end up with a fine hole out of this fragile material. If otherwise, you may end up cracking your glass.
I hope you enjoyed reading the article and you fully understand how to drill a hole in glass. If you found my how-to guide useful, feel free to share it among your circle of handymen.


