So you’ve gotten your hands on a shiny new piece of kit — now you just need to know how to use a clamp meter!
Digital clamp meters are great tools, whether you’re an experienced professional or an amateur who’s just starting out — I think that everyone should have one in their toolbox.
But once you bring it home and unpack it from the box…what the heck do you do with it?
I’ve written about a lot of different multimeters, but digital clamp meters are a slightly different ball game.
Don’t worry, I’ve got you covered! This is your complete 101 on how to use your digital clamp meter. But, if you need to know how to use a multimeter, take a look at my Multimeter User Guide.
Clamp Multimeter Basics
Before using your machine, it’s useful to grasp how it’s different from a standard digital multimeter (DMM) and how it works:
Multimeter vs. Digital Clamp Multimeter
While a digital clamp meter is basically just a DMM combined with an internal current sensor, there are two key differences:
- A digital multimeter mostly measures voltage, but it has a few current capabilities. A clamp meter does the opposite — it’s great for measuring current, but a little lacking when it comes to the type of voltage checks it can perform.
- Multimeters use probes to check electrical current, allowing you to test by placing the points of the probes onto the component or wire. Clamp meters work — as the name suggests — by clamping around the wire.
Clamp Meter — How It Works
One of the most common electrical questions I face here at Tool Nerds Towers is how does a clamp meter work?
Inside the hard jaws of your new digital clamp meter is ferrite iron — this is what measures the magnetic field of current as it flows through the machine’s conductor.
A current transformer senses the fluctuations in the magnetic field and converts the value to an AC reading, which shows up on your display. Clamp meters are great for high AC currents, which make them an ideal tool to have around.
If you’re familiar with how direct currents (DC) work — and its complete difference to AC — you might wonder how a clamp meter can work when you need to measure the former.
DC currents flow in a fixed polarity, that is, the magnetic field doesn’t change. So is measuring DC current with a clamp meter even possible?
Yes, it is!
Clamp meters that can measure DC amperage utilize the Hall Effect to give you a correct measurement. Bear in mind, this isn’t a feature on all machines.
However, digital clamp meters aren’t limited to just AC/DC amp measurements. Your unit may have included extra sensors to make the tool even more versatile. If that’s the case, you can plug test leads into your clamp meter to analyze things like voltage.
Here’s the best part — unlike old-fashioned test probes, you can use a clamp meter to get a current reading without breaking the circuit. No shutting off equipment, no cutting into wires — just clamp the meter around your target and get your reading. Safe and convenient.

How To Use a Clamp Multimeter
Now down to the most important stuff! I’ve put together an ultimate step-by-step guide for you.
1. Know thy clamp meter
Before you start using your clamp meter, understand what you’re looking at, as reading accuracy detail differs across meters. For example, if you own a clamper with 0.2 amp indices — don’t expect to see changes of 0.1 amps. Typically, the more pro-grade the machine, the more precise readings you can expect. Furthermore, even though clamp meters are super reliable, they aren’t as accurate as DMMs — there’s room for slight errors. This is because environmental electromagnetic fluctuations can affect the meter — not a factor when using a DMM, where probes touch components and wires. Your accuracy will usually be expressed as a percent, kind of like the margin of error you see in surveys. So, if your test delivers a result of 200 amps, with three percent accuracy, the actual current could be anywhere between 194 to 206 amps.2. Digital Clamp Meter — How To Use the Different Components
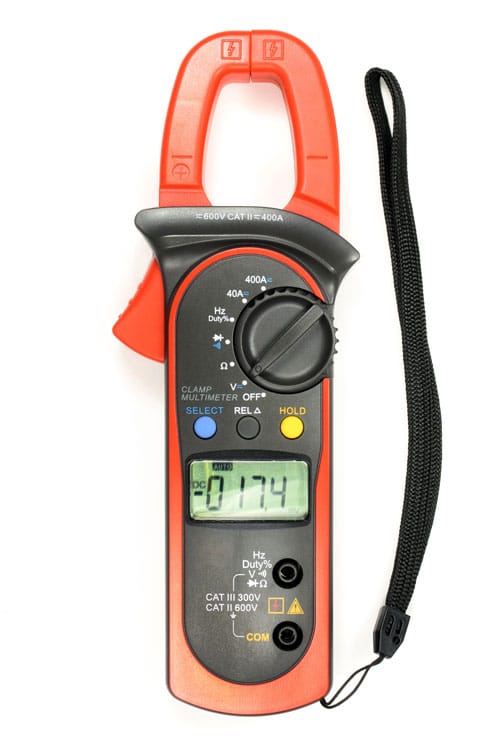
The unusual design and number of parts of a clamp meter can be unnerving for newbies. Generally speaking, they include:- Power Switch For turning the machine on or off. Most units include an auto-power-off feature to save the battery if it’s been left idle.
- Clamp Also known as the jaws, the clamp feature immediately distinguishes a clamp meter from a standard DMM. They detect the magnetic field generated by a flowing current.
- Clamp Trigger When squeezed, it operates the opening and closing of the clamp or jaws.
- LCD Screen Indicates numerous factors — which may include battery power, current, voltage, and frequency.
- Hold Button When pressed, it keeps your latest reading on the display. Allowing you to analyze and interpret the test.
- Backlight Illuminates the whole of the LCD screen — useful for working in poorly lit areas or outdoors at night.
- Positive and Negative Terminals (selected machines) Permits you to attach probes to the clamp meter — such as with a multimeter — for direct contact testing.
- Rotary Dial Turning allows you to choose your analyzation method — such as continuity, resistance, voltage, or current. This is dependent on your make and model.
3. Clamp Meter Function Symbols
If you’re not familiar with digital clamp meters, the display can look like it’s in Greek — because some of it is! Once it’s explained, however, it’s easy to read. Always check the manufacturer’s instructions for a complete explanation of your particular unit. However, depending on your machine, here are some of the most common terms you may see on your rotary dial or display:- Inrush Short for inrush current. If it’s lit up, the display is showing the initial surge of current flowing through the circuit. This is useful for detecting start-up problems in motors.
- Ω and kΩ Ohms and kilo-ohms — the metric used for measuring resistance.
- Hz A metric for measuring frequency, it can be selected on the dial and then displayed on the screen.
- MAX/MIN/AVG Some clamp meters permit you not just to test the immediate resistance or voltage — but also the maximum, minimum, and average current over a period of time.
4. Measuring Amperage With a Clamp Meter
The core function of your clamp meter is to measure current, reported in amps. It’s straightforward — select the current you want to measure, open the jaws, and put them around (not on) the wire. Wait for the reading. Done Of course, there are some nuances in those instructions. Let me break it down:- If your meter currently has testing probes plugged into the negative terminals, remove them. Should your machine not have this capability, there’s nothing to do.
- Turn the rotary dial to the correct position to measure current. The number of options you have will depend on your unit. All will have the ‘A’ symbol to indicate amps, but in addition, might be further nuanced with:
- A AC – for AC amp testing.
- A DC – for DC amp testing.
- 20A, 200A – for results in tenths or hundredths.
- Ensure the circuit you’re about to test is switched on — otherwise the current will be zero! Naturally, if you have exposed the internals of a machine, be careful not to come into contact with any live wires or components.
- Place and close the clamps around your test wire, and wait for the LCD screen to show the result. If needed, press the HOLD button to retain the reading, or the MIN/MAX/AVG button to log more detailed information.

Testing Voltage and Resistance With a Clamp Meter
What if you want to measure something other than current? If you’re looking to get a reading on something like voltage or resistance, your process will look different.
Voltage
Measuring voltage is a little more complex. Instead of just using the hard arms, you’re going to have to break out the test probes (if your machine has this capacity). Here’s how the process changes to measure voltage:- Choose the voltage you’re trying to measure: AC or DC.
- Plug in the test probes — the black probe goes to the COM jack, while the red connects to the V/O jack.
- Select the range, just like if you were measuring current.
- Touch the tips of the probes to the opposite ends of the wires, or legs of the component, of your target.
- If you want to remember your reading but get away from the electrical source, you can press the HOLD button to freeze the data. Then you can walk away without worrying about forgetting the numbers.
Resistance
Measuring resistance is mostly the same as measuring voltage — you make sure resistance is selected, plug in your test probes, and select the range. Instead of touching the tips of the probes to the circuit, you connect the probe tips across the part of the circuit you want to measure. The biggest difference is most important — resistance measurements can only be made with the circuit’s power off. Unlike measuring current or voltage, measuring resistance with the power on could damage either the circuit or your meter.
Clamp Meter Safety
When used correctly, clamp meters are perfectly safe. However, always remember electricity is hazardous — therefore, you need to take some precautions to avoid shock:
- Always read and follow the manufacturer’s manual, instructions, and guidelines for use.
- Only permit qualified professionals to service or repair your clamp meter.
- Don’t use your machine around water or explosive gas.
- Never test more than the rated CAT voltage displayed on the meter casing.
- Never use the clamp to check the current while the test probes are plugged in.
- Always check the meter case, terminals, clamp jaws, and probe wires for cracks, breaks, or damage before operation.
- If you’re unsure what you’re doing, contact a professional.
Maintaining your digital clamp meter
How To Use a Clamp Meter Conclusion
You now know how to use a clamp meter!
You can use your new tool for service needs, installation troubleshooting, and maintenance of electro-mechanical systems. Whatever you bought the meter for, you can rest assured that your new tool is safe, reliable, and a huge time-saver.
By buying a digital clamp meter, you’re making a great investment that’s sure to last.
Do you have a product that you’d like us to review, or do you have a question not answered here? Let us know!
If you enjoyed this How To Use a Clamp Meter guide, and believe one of your buddies could benefit from reading it, please feel free to share!


