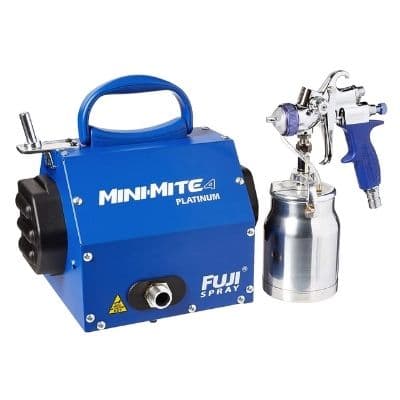
Fuji Spray is known for producing high-quality paint sprayers for home improvement enthusiasts and professional painters alike. The brand incorporates powerful motors, lengthy hoses, with portable and lightweight designs to produce ideal alternatives to a brush and roller — until they stop working. However, there are things you can do, which I’ve included in this Fuji paint sprayer troubleshooting guide — to get you back on track.
Fuji Paint Spray Gun Troubleshooting Tips and Tricks
The issues surrounding paint spraying generally fall into two categories. It could be that your finish isn’t turning out the way it should, or there are problems with the gun and dispersal of the paint. Whichever it is, you can try the following to solve this dilemma.
Problems With the Finish
There are a few things that can affect the final finish of your painting project, but fortunately, there are techniques and solutions to iron them out. The problems you may encounter and their solutions are:
1. Orange Peel Effect
As the name suggests, this is when you end up with a rough finish resembling the look of the outer flesh of an orange. It’s caused by your paint being too thick — thin it down according to the manufacturer’s instructions.
Another cause could be the air control valve is turned down, so make sure it’s open fully. However, it’s worth bearing in mind, sometimes it could be a combination of both the thickness of the material and the air valve being closed — be prepared to experiment a little.
2. Gritty or Rough Finish
When you’re refinishing projects on wooden surfaces like furniture or pianos, products like oil or silicone may have soaked into the wood. This can produce flaws known as fish eyes. If this happens, mist two or three coats of lacquer lightly before applying your final wet coat.
3. Fish Eyes
If you’re anything like me, as soon as you obtain your newest power tool you want to start playing with it immediately, right? No one wants to spend hours reading a manual the size of War and Peace when you could instead be getting down and dirty with your flashy new toy.
The beauty of a hand held sprayer is its straightforward operation. In most cases, you just fill with paint, attach to the mains, and go. On the other hand, externally powered machines require a plethora of preparation steps even before you think about spraying. For that reason, handheld shooters are ideally suited to electric painting novices.
That said, and I hate to sound like a killjoy, but always read the manufacturer’s instructions before use.
Some higher-end units have novel and unusual features such as turbine boosts, reversible tips, and flow control dials. You should probably get a grasp of these features before trying to revarnish your wife’s antique table, bequeathed to her by her recently deceased grandmother.
Fuji Semi-Pro Spray Gun Troubleshooting or Mini Mite Spray Gun Issues
Several problems can arise when you’re using your spray gun.
1. No or Very Little Paint
So, you’ve set yourself up for a painting project, you pull the trigger on your Fuji spray gun, but very little or zero paint atomizes. Here are some of the causes and what you can do to remedy the issue.
- Pressure tube, check valve, or nipple is blocked — your system cannot pressurize the cup if there is a blockage preventing air from passing through the pressure tube, nipple, or check valve. Inspect the tube for dried paint or debris and clean it if necessary. If the blockage is in the hole of the nipple, you can use a pipe cleaner to dislodge and remove it.
- Insecure cup fitting — check the cup lid is fastened correctly to the gun.
- Worn gasket and leaking air — replace the gasket.
- Empty paint cup — make sure there is material in your paint cup.
- Blocked fluid tube or fluid coupler — although this happens very rarely, the material could be blocking the fluid tube or the coupling connection. Clean according to the manufacturer’s handbook.
2. Uneven Spray Pattern
The last thing you want is an uneven finish on your work. If your spray pattern isn’t covering the area properly, check the following points:
- Air cap blockage — remove the air cap and check for dried paint. You can clean the nozzle by soaking it in solvent and using a soft bristle brush or rag to remove debris. However, never use metal objects to clean the holes in your air cap, this can lead to damage.
- Paint detritus — dirt, debris, or any other material in your paint can accumulate and block the air cap. To negate this, always strain your paint first to get rid of any foreign bodies.
3. Material Leaking from the System
There are a few places that you might notice fluid leaking from your paint spraying system. These include:
- Medium seeping from your nozzle (when you aren’t pressing the gun trigger) — the needle may not be seated properly or is loose, or the needle packing nut is screwed in too tightly, stopping the needle from moving — take care when loosening the packing nut not to damage it.
Alternately, check for a worn or damaged needle or nozzle or foreign matter trapped between the two — replace or clean as appropriate.
Finally, if you have the wrong nozzle installed in your spray gun, it will leak, so select the correct nozzle size.
- Fluid leaking from the paint cup area — check the gasket or diaphragm to make sure they aren’t worn and replace them if necessary. Oil below and above the lever to ensure smooth action.
For leaks around the nipple or side pins, use Loctite to seal them — you can also use Loctite on the nut under the lid if there is seepage from this area.
- Leakage around the needle packing nut — if the packing nut holding the needle in place is too loose, it will leak. Tighten it with care according to the manufacturer’s directions. You can also lubricate the shaft of the needle, where it passes through the packing nut to keep it moving smoothly.
4. Trigger is Slow and Unresponsive
If you engage the trigger for spraying and you find it sluggish, it could be down to a couple of possible reasons.
- Needle packing is too tight — loosen the packing nut for the needle. Take care to use the correct wrench and make small adjustments.
- Bent needle — replace the needle in the spray gun.
5. Poor Spray Pattern
If your spray pattern is showing signs of patches or the spray isn’t consistent, look for the following possible faults.
- Damaged needle or nozzle — inspect your spray tip and needle and replace them if they show signs of wear or damage.
- Clogged spray nozzle or holes in the air cap — check for dried paint or other debris in the air cap and nozzle and clean by following the manufacturer’s manual.
- Spraying too far away from your target surface — if you’re spraying from more than 8 inches away from your chosen surface, not enough paint hits the target. Move the gun closer until you attain the coverage you want.
6. Spray Gun Pulsates in Use
If your atomized material feels like it keeps cutting in and out or pulsing, there are a few culprits you can point the finger at:
- Loose or worn needle packing — tighten the needle packing nut carefully or replace the packing.
- Paint in the cup is running low — refill your paint cup.
- Spraying too far away from your target surface — if you’re spraying from more than 8 inches away from your chosen surface, not enough paint hits the target. Move the gun closer until you attain the coverage you want.
- Loose paint cup lid — if the lid on the paint cup isn’t fitted securely, air can escape — make sure it’s nice and tight.
- Pressure tube damage — if there is a small hole or crack in the clear plastic pressure hose, air can escape — it will need to be replaced.
- Clogged nipple or pressure tube — examine these parts for blockages and clean or replace them.
7. Too Much Overspray
HVLP spray guns are known for creating very little overspray, saving you money on material waste and keeping the air cleaner. If you find this isn’t the case, here are some tips to correct it.
- Reduce the size of your spray pattern — it might be too wide for the item you’re spraying.
- Hold your spray gun closer, if it’s too far away, your paint won’t be hitting the target — this distance should be 8-inches maximum.
- Make sure you trigger on and off at the end of each pass.
- Your paint could be too thin, so either change the spray tip or use thicker material.
- Turn down your air valve until you achieve the finish you want while reducing the overspray.
Fuji Turbine Paint Sprayer Troubleshooting
Fuji Pro and Mini-Mite paint sprayers are powered by a turbine. Within this unit, there are filters essential for keeping your spray gun working. If you don’t maintain and clean the filters or change them when necessary, your unit can overheat and fail to perform.
The filters can be removed and washed in soapy water before being dried and replaced. Some models have one filter and others two, so check your user manual to find out which you have.
You can also prolong the life of your turbine by:
- Turning it off between coats or when refilling your paint cup. This gives the machine a chance to cool down.
- Spray in a well-ventilated area, and make sure the turbine is located at least 15-feet from your spray area. This stops overspray clogging up the filters, which in turn, can result in damage to the motor.
- If your turbine doesn’t work, check your power outlet is functioning. There is also a breaker on the turbine — test by pressing it once.
Never try to open and service the turbine unit yourself. This is a specialized job that calls for Fuji approved technical help.
Fuji Paint Spraying Support
We’ve covered many of the scenarios that could be preventing you from achieving the perfect finish you want from your Fuji paint sprayer. Your owner’s manual supplies you with detailed information about cleaning and maintaining your paint sprayer, which is a solid backup for Fuji paint sprayer troubleshooting.
However, should you feel the need to speak to someone about why your Fuji paint sprayer isn’t working or its 2-year warranty — you can find the contact details here.
Our Rating: 4.8
With a 1400 watt, two-stage motor and Fuji’s M-Model non-bleed spray gun, the Semi-Pro 2202 is a powerhouse of a paint sprayer. Suitable for waterborne and solvent-based paints, it boasts stainless steel fluid passages for easier cleaning. The fan pattern can be adjusted from one to 12 inches, making it precise for detail work and speedy for wide coverage.
Features
- 1-quart siphon feed paint cup.
- 1.3 mm spray tip.
- 25-foot hose.
- Metal turbine case with gun-holder.
Fuji Paint Sprayers — Our Top Picks
| IMAGE | PRODUCT | DETAILS | ||
|---|---|---|---|---|
 |
Features
|
Check Price at Amazon Nerds Review Nerds Review | ||
 |
Features
|
Check Price at Amazon Nerds Review Nerds Review | ||
 |
Features
|
Check Price at Amazon Nerds Review Nerds Review |


