The definition of resistance is pretty simple – It is the measure of difficulty electrons have while flowing through an object.
It is measured in Ohms, but one can stumble upon other archaic measurement units, depending on the year a multimeter is issued.
However, there is no need to get familiar with other units because Ohm is a widely accepted SI unit thus being the primary one for measuring resistance. 1 ohm is equal to 1 volt difference per 1 ampere of current. If you’re not a devoted professional, this formula is not as relevant. The resistance of a particular object can be measured with a digital or an analog multimeter.
We will cover both analog and digital multimeters in this particular article so that you can get a better insight into the differences, advantages, and shortcomings of each.
Measuring Resistance With a Digital Multimeter
Pick an Item Whose Resistance You Want to Measure
If you want to measure the resistance of a component that’s integrated into an existing circuit, your safest bet is to exclude it from the circuit by demounting it. Measuring while it’s connected can yield inaccurate data. In fact, more often than not, you’ll get inconsistent results due to the interference of other components within the circuit. Therefore, the best thing to do is to take the object you’re planning to work with out of the scheme and eliminate interference.
Make sure that you turn off the power circuit before accessing the board.
Plugging the Leads Into Correct Sockets
A lot of people who are inexperienced tend to plug in the leads randomly, despite the color markings. Most modern multimeters feature a red and black lead with corresponding colors on the casing of the unit. In other words, if you have colored leads, plug the black one into the black socket and do the same with the red one. That way you can be certain that there are no errors along the way.
Truth be told, most units simply won’t yield any results if the leads aren’t plugged into the right socket.
Furthermore, most models have a couple of sockets on the casing. Other ports are used for measuring amperage and voltage. One resistance port is usually labeled “COM” (common) whereas the other is labeled with the Greek letter Omega (Ω) which is the symbol for Ohm.
Plug the black lead into the COM socket, and the red one into the Omega-labeled one.

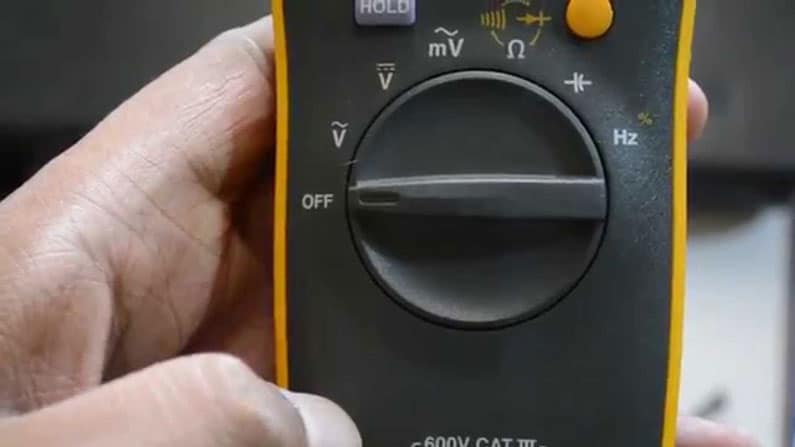
Selecting the Range
In order to get an accurate reading, you must first select the appropriate range. This particular step can be quite a nuisance, especially if you aren’t sure which range to choose. The overall spectrum can vary from 1 ohm up to megaohms (a million).
Some modern units feature an auto-selection mode, while most others don’t. If you don’t have a meter with auto features, you can find the corresponding range by using a simple method described below –
- Start with the middle range settings <= 20 kilo-ohms
- Contact one end of the component with one lead and vice-versa
- If the displayed resistance is zero (0) the range is too high
- If the displayed resistance is OL (overload) the range is too low
- If the displayed resistance is a number other than 0, the range is set
Remember to check the applied range when reading the values. For example, if you get a value of 30 and you’ve selected the kΩ scale, that means the value is 30 kilo-ohms instead of being 30 ohms.
In order to double-check the reading, try lowering the range and see if you get similar or same results. Also, if you’re aiming for higher accuracy, lower scales are the way to go.
Confirming Results
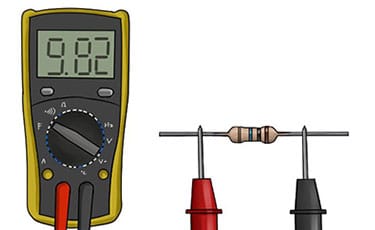
Once you have found the right range, it’s time for the final reading. It doesn’t differ much from the previous step except now you have the right spectrum to go with.
Put one lead on one end, and the other on the other end of the component you’re measuring. Wait for the numbers to stop fluctuating and once they do – it should display the resistance.
Make sure you remember the scale you’re on at all times. For example, if you get a .1 reading on the kilo-ohm scale, that means the resistance of the component is 0.1 kΩ.
Turn the Unit Off
Once you’re finished, turn the multimeter off.
If you are looking for more information on multimeters or for digital multimeter reviews please check out our info.
Measuring Resistance With an Analog Device
Choose the Item
The first step is the same regardless of the type of multimeter you’re using. Pick the component whose resistance you want to measure and exclude it from the circuit. Once again, you can measure the values while the component is integrated into the circuit, but the results will be inconsistent and inaccurate.
Insert the Probes Into the Required Sockets
Same as the digital devices, analog ones also feature a few ports. It’s very important that you insert the leads into correct ports or else you won’t get any readings whatsoever. There are two ways of doing this correctly – by color or by labeling.
If the unit has color-labeled ports, insert the corresponding colors in – it’s a simple as that. Red lead goes into the red port, while the black one goes into the black port.
In case the sockets aren’t color-labeled, insert the black lead into the COM port and the red one into the socket labeled with the Ohm symbol.
Finding the Range
Finding the range doesn’t differ much from the method used with digital units. The biggest difference is in the display. If you’re uncertain about the range, you can use the aforementioned method once again with a few minor differences.
- If the needle swings across the scale and stops on a particular value, you’ve found the right range.
- In case the needle swings to the left side, the range setting is too small. Zero out the multimeter and start with an increased range.
- In case the needle swings to the right side, you will need to decrease the range and try again after zeroing the unit once again.
- Remember to reset an analog multimeter whenever you’re conducting new readings. The easiest way to do this is to touch both ends of the leads together.
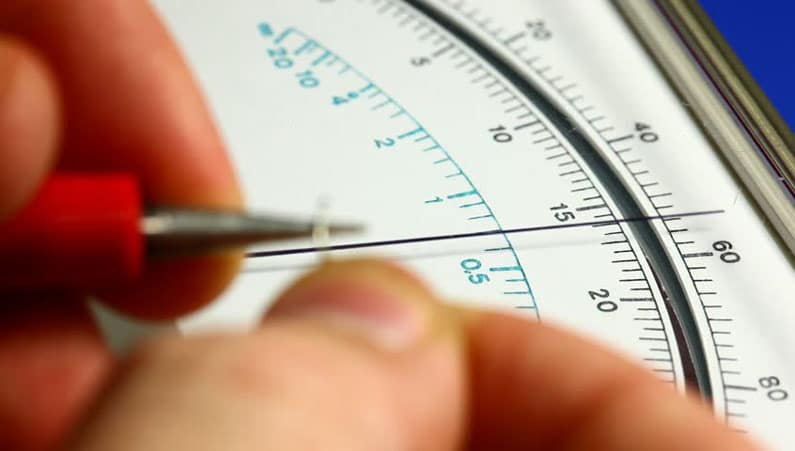
Conducting Measurements
Touch the opposite ends of the component with both leads, just as you did it during the previous step. Bear in mind that the resistance on the analog unit usually goes from right to left.
The right side is zero whereas the far left side is usually around two kilo-ohms, depending on the model. You should also keep in mind that there are multiple scales on the screen meaning you have to stay focused and read the right one.
Reading the Results
Once you’ve touched the component and made sure the scale is correct, the needle should be pointing to the correct value. Therefore, if you’ve set the range to 100 ohms and the needle stops at number 8, that means the resistance, in that case, is 80 ohms.
Reading the results is pretty simple and yet many people don’t know how to do it because they don’t know which scale to refer to. One of the common errors is not accounting the “mega” or “kilo” prefix. In other words, if you see the needle stop on the number 5, that doesn’t mean the resistance is 5 ohms. Instead, it means that it’s 5 x your-selected-scale.
For example, if you selected kilo-ohms and got the reading of 5, that means the resistance is 5000 ohms or 5 kilo-ohms.
Remember to Set the Voltage to High Range
Once you finish using an analog multimeter, make sure you set the voltage scale to the highest. This prevents potential damage if anyone after you decide to use the unit and not check the previously set range.

The Conclusion
As you can tell, anyone can measure resistance with a multimeter if they know how to do it properly. Misuse of a multimeter can be dangerous on some occasions, but the biggest danger you’re facing is breaking the unit itself by conducting measurements while the wrong scale spectrum is selected.
There are plenty of household appliances that require a checkup from time to time. Instead of hiring a professional and paying them for their services, you can do most of the testing yourself with a proper multimeter. If You are after an affordable multimeter check out multimeters under $50.
This guide is designed to give you an idea of how to conduct simple measurements and save some time and money. On the other hand, if you’re not confident enough and are afraid of dealing with electricity, don’t hesitate to ask someone to help you or hire a professional. As we all know, dealing with electricity shouldn’t be taken lightly, regardless of one’s experience.


